Do you have a lot of data on your desktop hard drive that you need to access on your laptop If so, don’t worry – it’s easy to connect the two devices together. In this article, we’ll show you how to do it. Keep reading for step-by-step instructions.
The first step is to make sure that your desktop hard drive is turned off. Once it’s off, connect the power cable to it and plug it into an outlet.
Now, you’ll need to find a spot on your laptop where you can fit the hard drive. It should fit in the same spot as your DVD or CD drive. Once you’ve found a spot, remove the cover to that area on your laptop.
Once the cover is off, you’ll see a few screws holding the drive in place. Remove these screws and set them aside – you’ll need them later.
Next, take the desktop hard drive and hold it so that the connectors are facing down. Then, carefully line up the connectors with the corresponding connectors on your laptop and press down until you hear a click.
Now, it’s time to put the screws back in. Line them up with the holes on the drive and give them a gentle turn until they’re tight.
Finally, replace the cover to your laptop and screw it in place. You’re done! Now, when you start up your laptop, you’ll see an extra drive listed under My Computer. This is your desktop hard drive – just double-click on it to access all of your data.
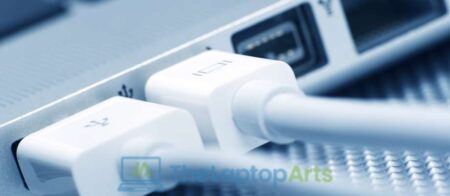
connect desktop hard disk to laptop by usb cable
There are a couple of ways that you can do this, but we’ll show you the most common way. First, make sure that your desktop hard drive is turned off. Once it’s off, connect the power cable to it and plug it into an outlet.
Now, take the USB cable that came with your desktop hard drive and plug one end into the hard drive. Plug the other end into a USB port on your laptop.
Once it’s plugged in, turn on your desktop hard drive. You’ll see a new drive listed under My Computer – just double-click on it to access all of your data.
If you don’t have a USB cable handy you can also use an eSATA cable. Connect one end of an eSATA cable to the hard drive and then connect the other end to a free eSATA port on your laptop.
Once it’s plugged in, turn on your desktop hard drive. You’ll see a new drive listed under My Computer – just double-click on it to access all of your data.
connect external hard disk
Proper way is by using usb connection between them.. And also i hope you have updated drivers for your laptop.. So first update drivers and then create a partition as well as format it… Then change lettering of partitions so that you can identify them… But first use pen drive or memory card or cd to transfer files from desktop to laptop…. because if you use usb then sometimes it is not working properly..
First connect the HDD to laptop with USB cable. Turn on your laptop with HDD connected to it. After windows booted in to windows, go to Control Panel >> Administrative Tools >> Computer Management. Open Disk management tool of computer management. Locate the disk which is having data of yours and right click on it and select “change drive letter and paths” option from context menu. Now click on Change button present there. You will see different disk path will be available for this HDD or SSD orelse any other storage devices like pen drives, memory cards etc… Select a new drive letter which you want to assign for this external hard disk. And if ask about whether you need to format the disk or not then click on no button and continue. After finishing all these steps, now your external HDD will be accessible from My Computer icon and you can easily copy paste files from/to it.
However, if by chance your laptop doesn’t have any eSATA or USB ports then you’ll need to buy a special adapter in order to connect your desktop hard drive. There are a few different types of adapters available, so you’ll need to do some research to find the right one for your laptop. Once you’ve got the adapter, just follow the same instructions as above – connect it to your desktop hard drive and then plug it into a free port on your laptop. Turn on your laptop and you’re good to go.